Controls have all kinds of properties and there are many events associated with them, but for now we'll just look at a few of them that are used in VBA programming:
Let's start by adding 3 controls - Label, TextBox and CommandButton:
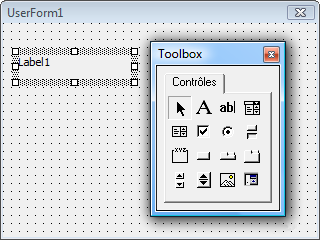
Let's now edit the name and properties of this control (using the Caption property, which contains the text). We want to get the following result:
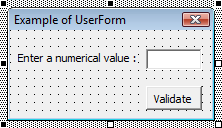
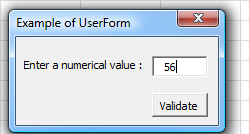
Now when we enter the number and click OK - nothing happens.
To create some kind of event, we'll start by adding an event that will enter the value from the text box into cell A1 and close the Form.
You can access the options shown below by double-clicking on the control:

This drop-down list contains various controls and this Form.
Select the button (Button) and the Click:
event
Private Sub CommandButton_validate_Click()

      Range("A1") = Textbox_number.Value
      'Textbox_number is the name of the text box
      'Value is a property containing the value of the text box

      Unload Me
      'Unload closes the form (UserForm)
      'We use Me instead of the form name (because this code is in the middle of the UserForm we want to close)
End Sub
The entered value will now already be saved in cell A1 before closing this Form (UserForm).
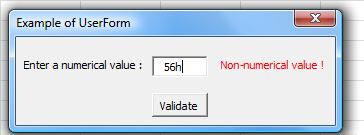
Add a second label (Label) and edit the following properties: Caption, Forecolor (color : red) and Visible (False to hide control element by default) :
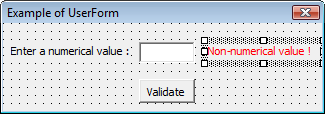
Now let's add an event that will be fired when the value in the text field is changed. The event will display an error message if the value is not numeric.
Private Sub Textbox_number_Change()
      If IsNumeric(Textbox_number.Value) Then 'IF is a numeric value...
          Label_error.Visible = False 'The label (Label) is hidden
      Else 'OTHERWISE...
          Label_error.Visible = True 'The label is visible
      End If
End Sub
The entered value will be tested each time the next character is entered.
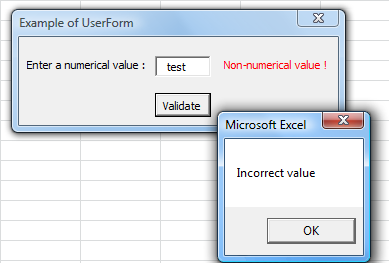
We still need to prevent form validation if the value is not a number.
Private Sub CommandButton_validate_Click()
      If IsNumeric(Textbox_number.Value) Then 'IF is a numeric value...
          Range("A1") = Textbox_number.Value 'Copy to A1
          Unload Me 'Close
      Else 'OTHERWISE...
          MsgBox "Incorrect value" 'Incorrect value
      End If
End Sub
In order not to leave the right side of the form empty when there is no error message, we can reduce its size by adjusting the Width property of this form:
Private Sub Textbox_number_Change()
      If IsNumeric(Textbox_number.Value) Then 'IF is a numeric value...
          Label_error.Visible = False 'The label (Label) is hidden
          Me.Width = 156 'Width of the form
      Else 'OTHERWISE...
          Label_error.Visible = True 'The label is visible
          Me.Width = 244 'Width of the form
      End If
End Sub
You can download an Excel file with an example: userform1.xls
Here is the result:
Here is an example of how to use a CheckBox:
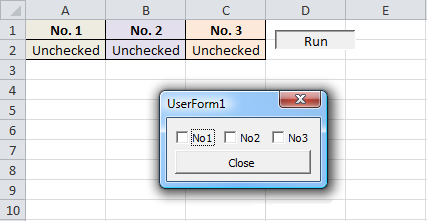
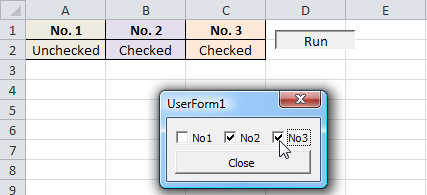
When the checkbox is checked/unchecked, the value of the associated cell can be changed by using the Click event:
Private Sub CheckBox1_Click() 'Number 1
      If CheckBox1.Value = True Then 'IF selected...
         Range("A2") = "Checked"
      Else 'IF not selected...
         Range("A2") = "Unchecked"
      End If
End Sub

Private Sub CheckBox2_Click() 'Number 2
      If CheckBox2.Value = True Then 'IF selected...
         Range("B2") = "Checked"
      Else 'IF not selected...
         Range("B2") = "Unchecked"
      End If
End Sub

Private Sub CheckBox3_Click() 'Number 3
      If CheckBox3.Value = True Then 'IF selected...
         Range("C2") = "Checked"
      Else 'IF not selected...
         Range("C2") = "Unchecked"
      End If
End Sub
In this example, the checkbox starts unchecked when the Form is opened for the first time.
To check the box when the value of the corresponding cells is "Checked", we run the check when the form is activated using UserForm_Initialize:
Private Sub UserForm_Initialize() 'If checked
      If Range("A2") = "Checked" Then
          CheckBox1.Value = True
      End If

      If Range("B2") = "Checked" Then
          CheckBox2.Value = True
      End If

      If Range("C2") = "Checked" Then
          CheckBox3.Value = True
      End If
End Sub
Here you can see an example in a finished Excel file: userform2.xls
The user can select only one option button per "group" unlike checkboxes.
To create a "group", first insert a Frame and then an OptionButton:
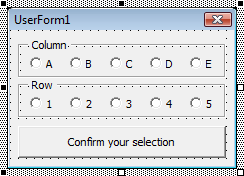
Here you can see an example in a finished Excel file: userform3.xls
Once the form has been submitted, we will enter data into the cell associated with the column name and row_value chosen.
In order to know which options were selected, we could do the same as in the previous example (with checkboxes) , but we will use a loop to reduce the code size.
We're going to use a For Each loop, a type of loop we haven't covered before. This loop allows you to execute instructions for each object in an "object group":
Private Sub CommandButton1_Click()
      Dim column_value As String, row_value As String

      'Loop for each Frame_column control
      For Each column_button In Frame_column.Controls
          'If the value of elem. control = True (then if selected) ...
          If column_button.Value Then
             'The variable "column_value" accepts the value of the button's text
             column_value = column_button.Caption
          End If
      Next

      'Cycle for another block
      For Each row_button In Frame_row.Controls
          If row_button.Value Then
              row_value = row_button.Caption
          End If
      Next

      Range(column_value & row_value) = "Cell chosen !" 'The cell is selected
      Unload Me
End Sub
This form now inputs the value "Cell selected!" in the selected cell.
To avoid bugs, we need to check if the user has chosen correctly from two sets of options.
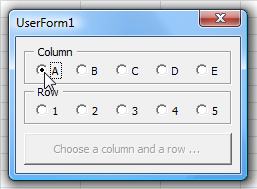
In this example, when the form is not yet complete, the "Confirm" button will be grayed out (disabled). It's not the easiest solution, but it's a good example of why functions/procedures are useful in the middle of a form (UserForm).
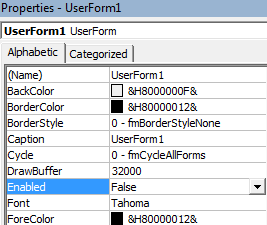
Edit the text and the Enabled property to disable the button.
The result will be as follows:
In the previous code, we used two For Each loops to get the value of the option buttons. Now we need to use the same values for the Confirm button and the Click event for the ten options.
For this, we don't need to copy the loops for the next event, we will call them through a function.
Starting with the previous code and modifying it, we will achieve this result:
Private Function column_value()
'A function that returns a text value for the selected button (column_value)
      For Each column_button In Frame_column.Controls
          If column_button.Value Then
              column_value = column_button.Caption
          End If
      Next
End Function

Private Function row_value()
'The function that returns the text value for the selected button (row_value)
      For Each row_button In Frame_row.Controls
          If row_button.Value Then
              row_value = row_button.Caption
          End If
      Next
End Function

Private Sub CommandButton1_Click() 'Action that happens when you click "Confirm your selection" ("Confirm your selection")
      Range(column_value & row_value) = "Cell chosen !"
      'column_value and row_value are the values returned by these functions
      Unload Me
End Sub
All we have left to do is create a procedure that checks if the option buttons have been selected correctly (by calling two functions), and which activates that button when needed.
Again, the validation is done in a separate procedure to avoid copying the code 10 times for each event of each radio button:
Private Sub activate_button()
'Activate the button if the condition is successfully checked
      If column_value <> "" And row_value <> "" Then
      'column_value and row_value are the values returned by these functions
          CommandButton1.Enabled = True
          CommandButton1.Caption = "Confirm your selection"
      End If
End Sub

Private Sub OptionButton11_Click()
      activate_button 'Start the "activate_button" procedure
End Sub
Private Sub OptionButton12_Click()
      activate_button
End Sub
Private Sub OptionButton13_Click()
      activate_button
End Sub
Private Sub OptionButton14_Click()
      activate_button
End Sub
Private Sub OptionButton15_Click()
      activate_button
End Sub
Private Sub OptionButton16_Click()
      activate_button
End Sub
Private Sub OptionButton17_Click()
      activate_button
End Sub
Private Sub OptionButton18_Click()
      activate_button
End Sub
Private Sub OptionButton19_Click()
      activate_button
End Sub
Private Sub OptionButton20_Click()
      activate_button
End Sub

Here you can see an example in a finished Excel file: userform3b.xls

